


Scheduling Reports for Automatic Email Delivery
★ Premium feature
This is a premium feature, available with an active premium subscription or trial. If you don't see it, contact us or your Admin to add it to your plan.
Preview feature
This feature is currently in preview. If you don't see it, contact us or your Admin to activate it.
Preview features:
- are provided as-is and aren't meant for production use.
- may have limited or restricted functionality, and details may change before general availability.
- are supported on a best-effort basis and may be subject to reduced or different security, compliance, and privacy commitments.
The Embedsy Portal can export a Power BI report on a recurring schedule and email it to each recipient as an attachment - yourself, other portal users, or (for admins) people who don't have a portal account at all. Regular reports can be exported as PDF, PowerPoint (PPTX) or PNG; paginated reports as PDF or Excel (XLSX).
Emails are sent through Microsoft Graph from your own Microsoft 365 tenant, from the Sender Email Address set in Global Settings, using the mail permissions granted to the service principal during installation - no third-party email service is involved.
Enabling scheduling permissions
Scheduling is permission-based. Nobody - including admins - sees the Schedule Report entry until an admin has granted it:
- Open Roles/Pages/Users, go to the Roles tab and add or edit a role. Check Can schedule reports so users with this role can create schedules. Also check Can schedule reports for other recipients if they should be able to send to people other than themselves. The same two options are available on the Entra Roles tab.

- Sending to other recipients additionally has to be allowed per report: on the Pages tab, click Edit Page on the report's page, check Allow scheduling to other recipients and save.
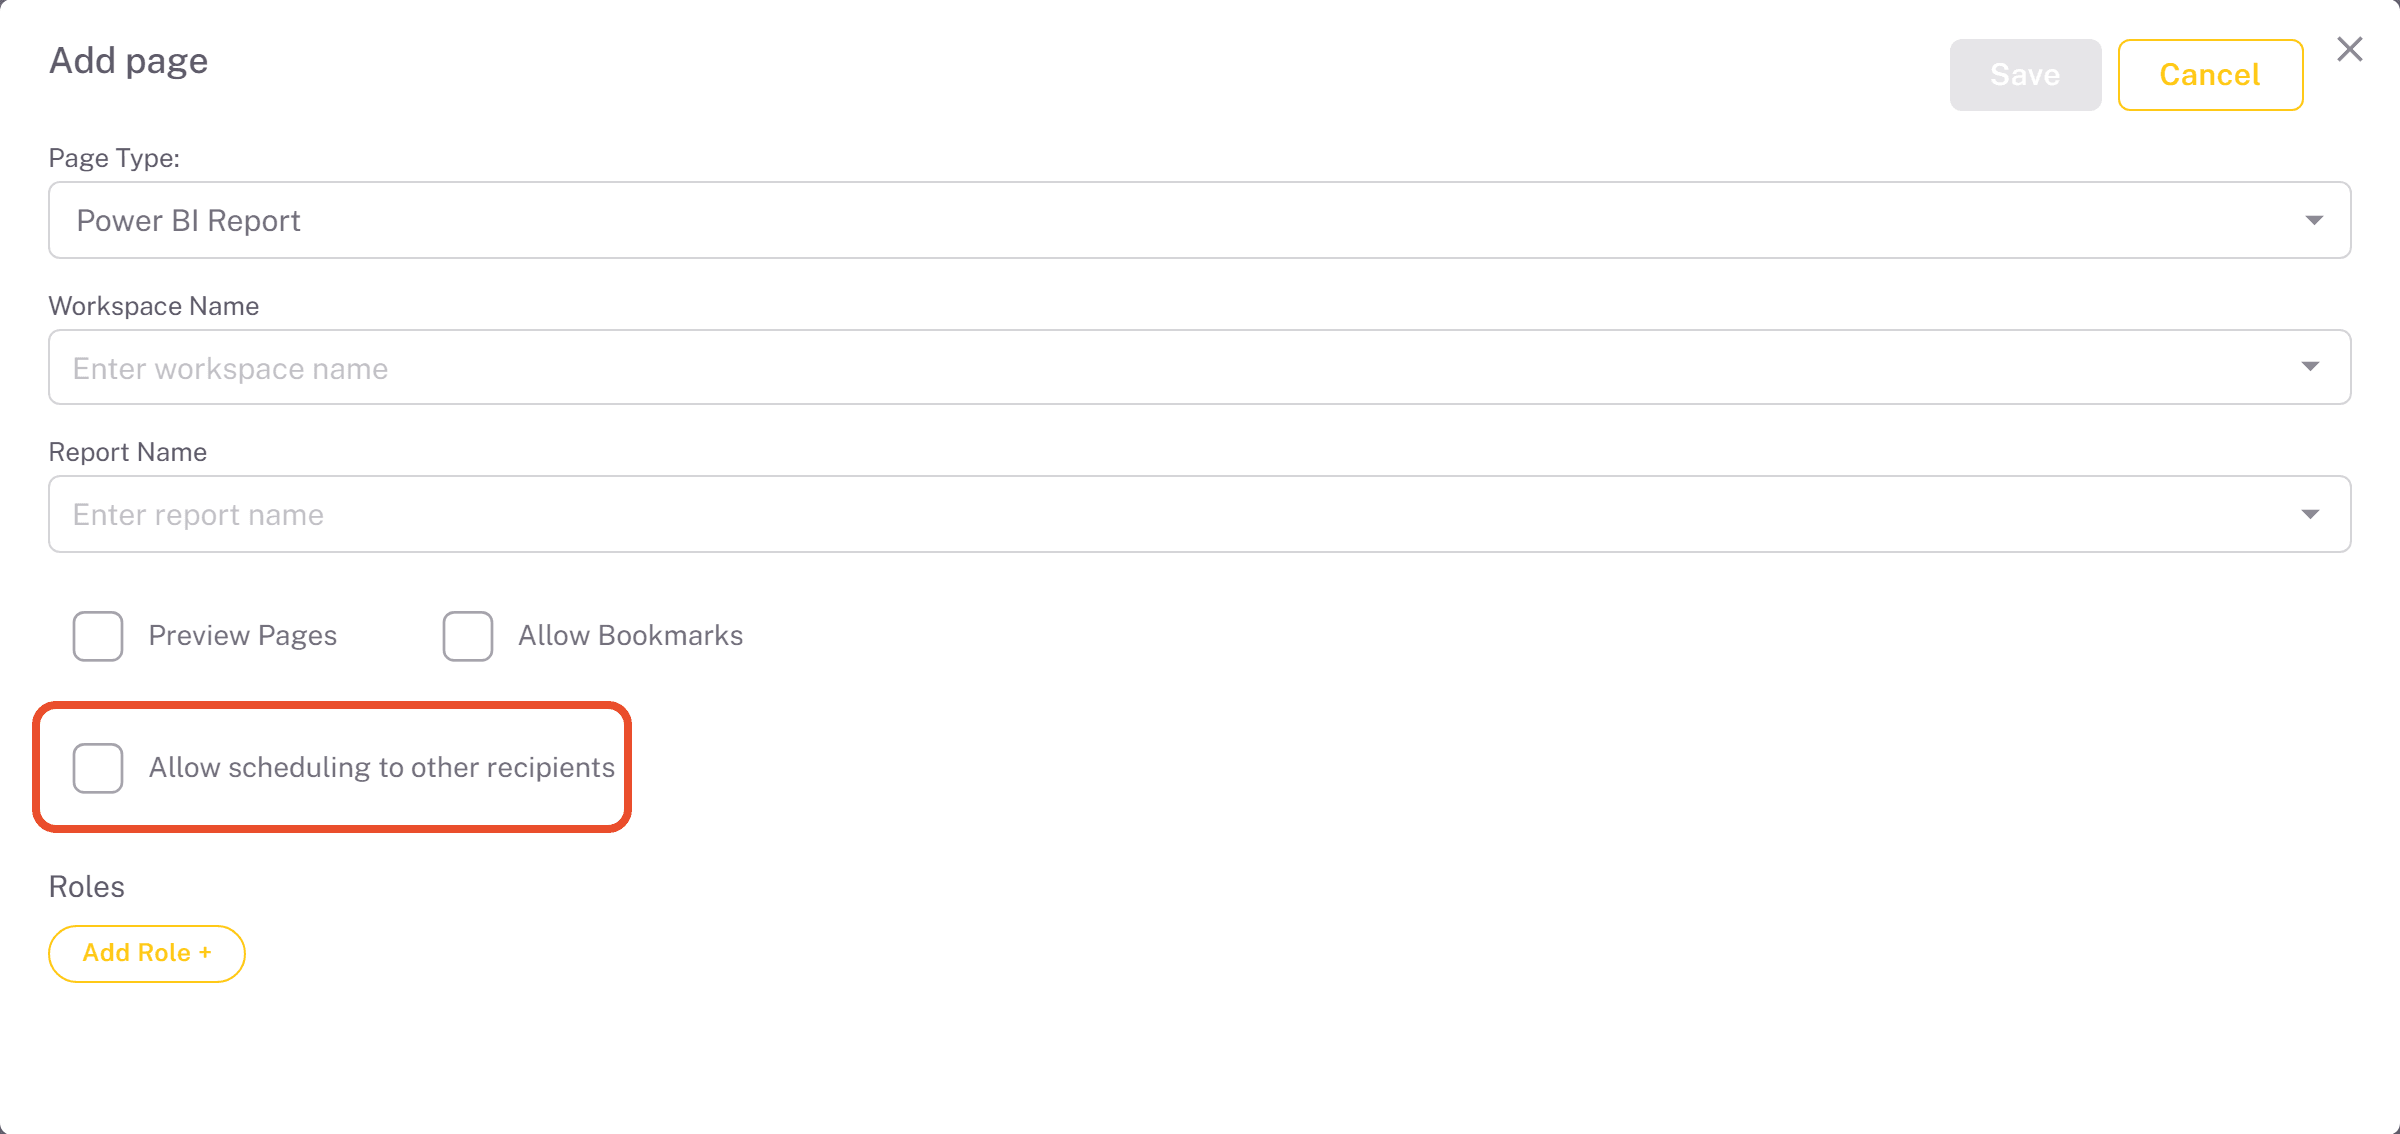
Both halves are required to send to anyone but yourself: one of your roles needs Can schedule reports for other recipients, and that same role needs the report on a page with Allow scheduling to other recipients checked. Admins are not exempt. Permissions are re-checked before every delivery, so removing them later pauses affected schedules (see auto-pause).
Scheduling a report
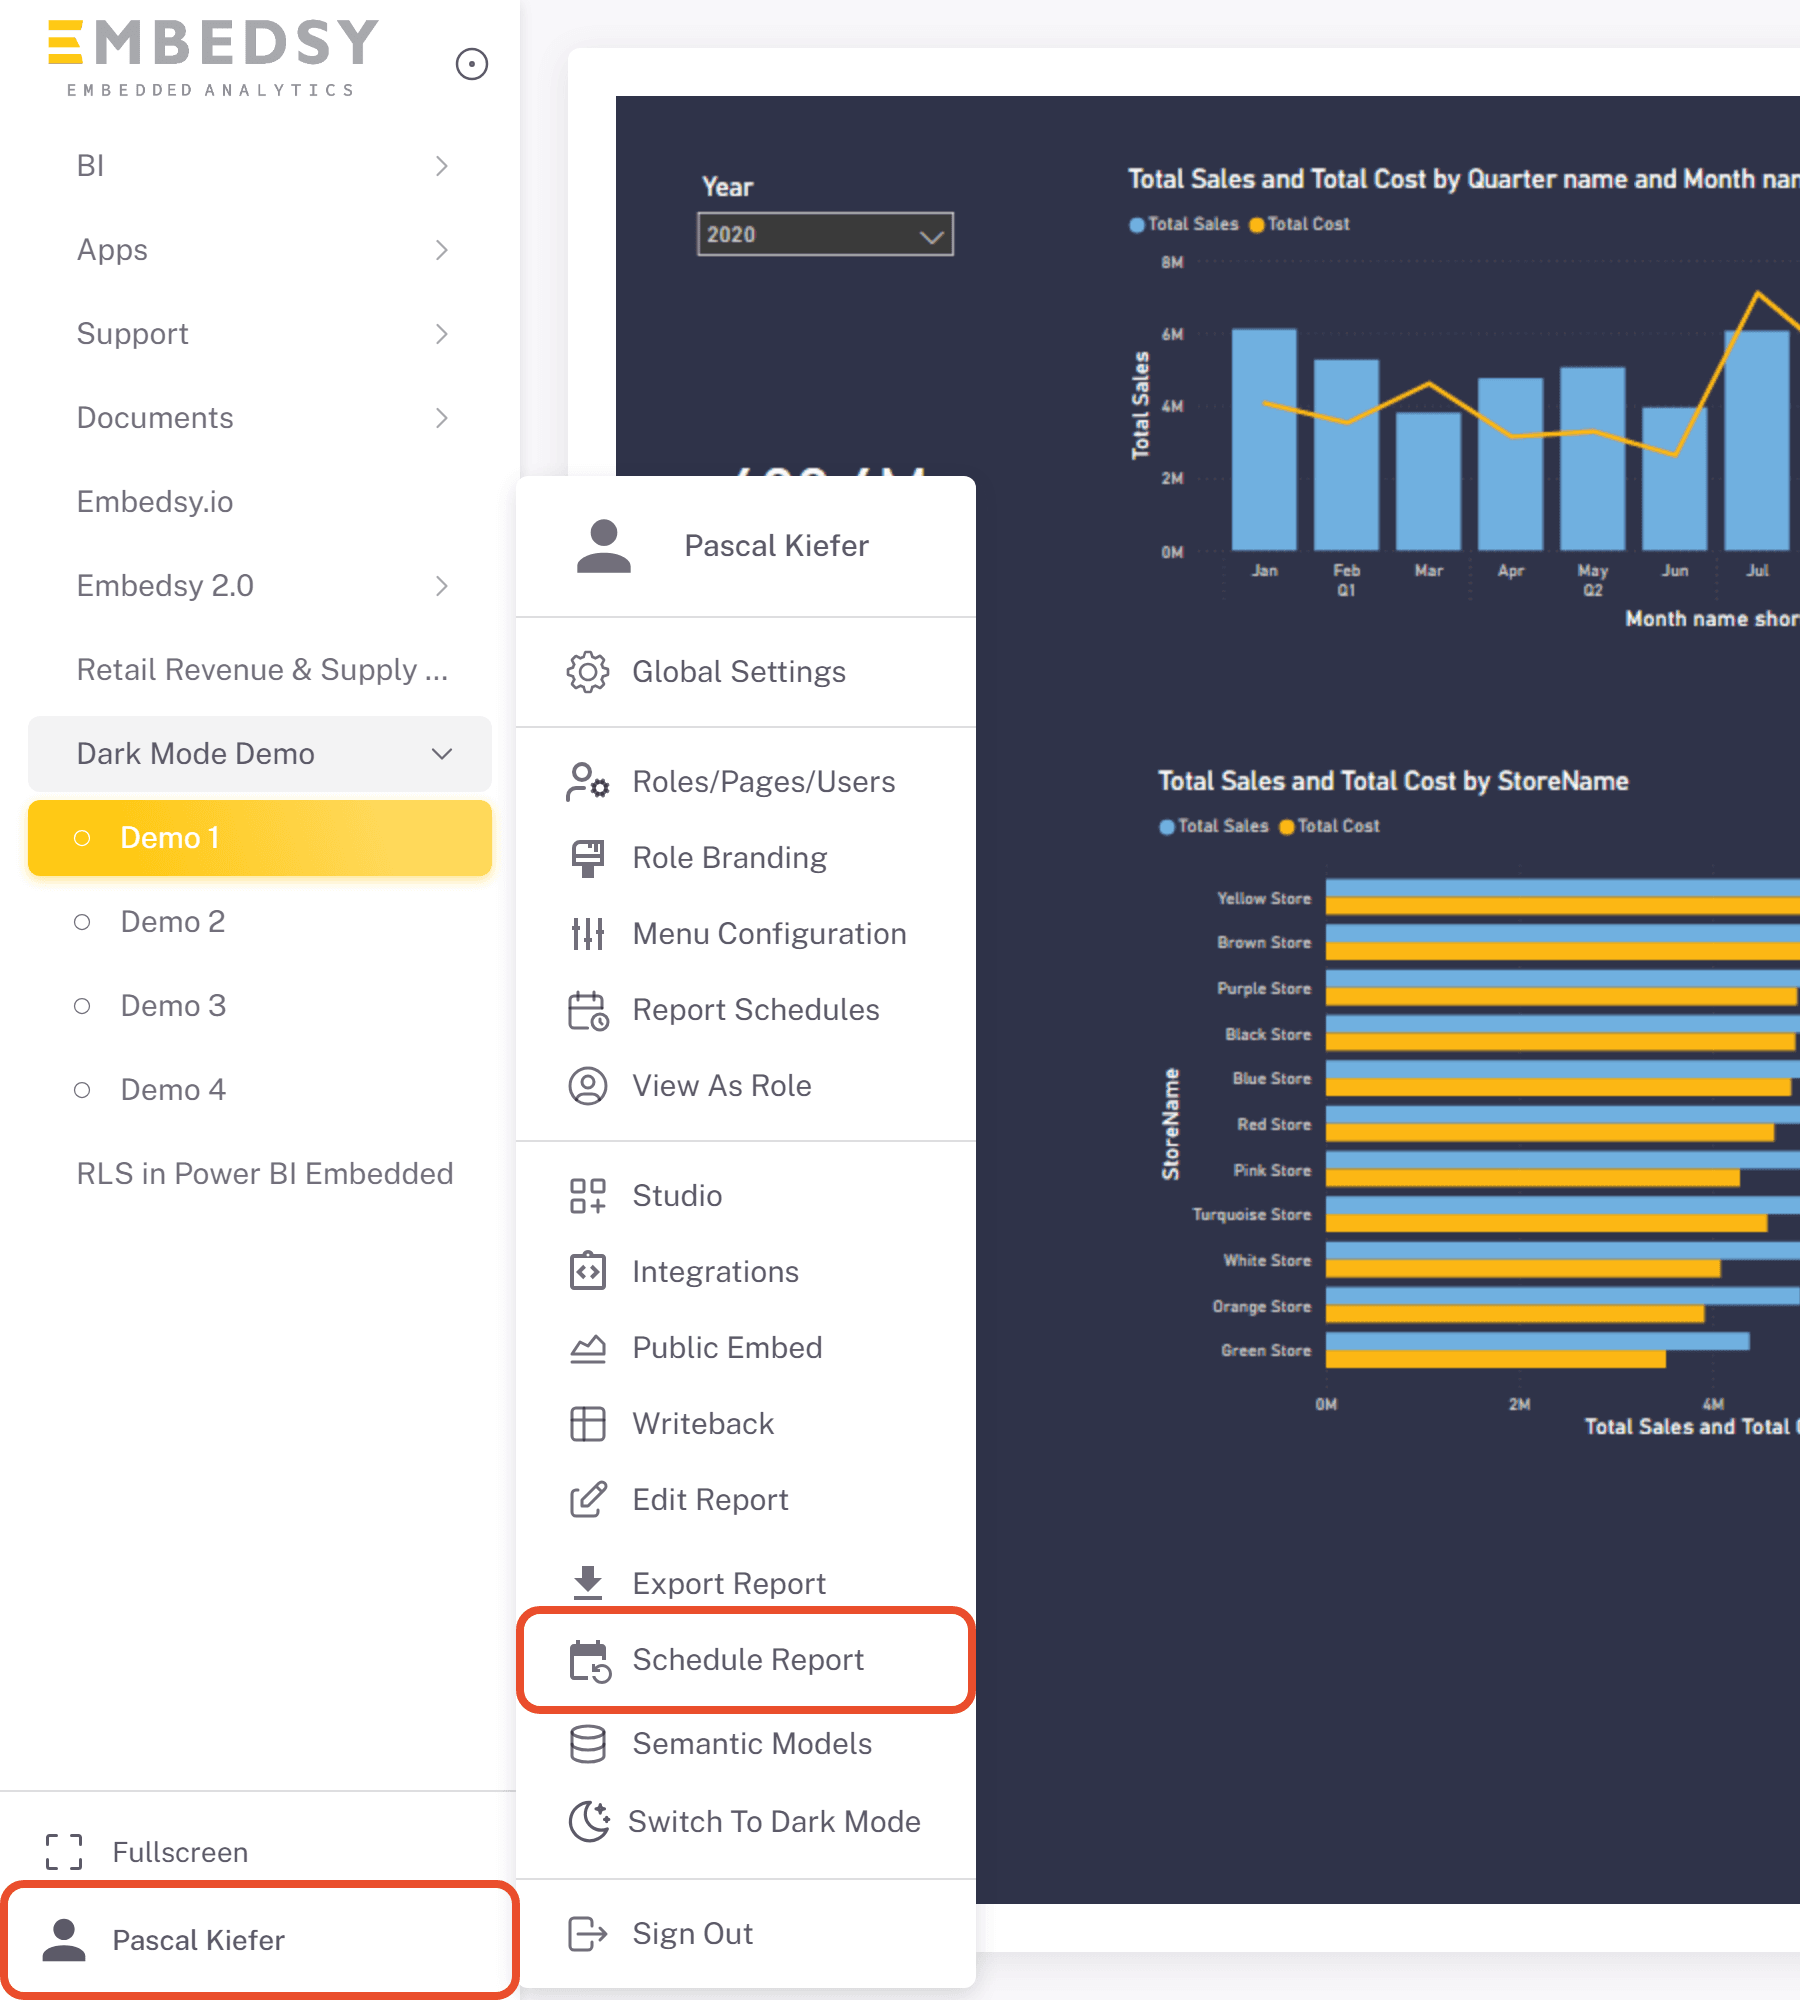
- Open the report you want to schedule, click your name at the bottom of the navigation and select Schedule Report. The entry only appears while a report is open and your role has Can schedule reports.
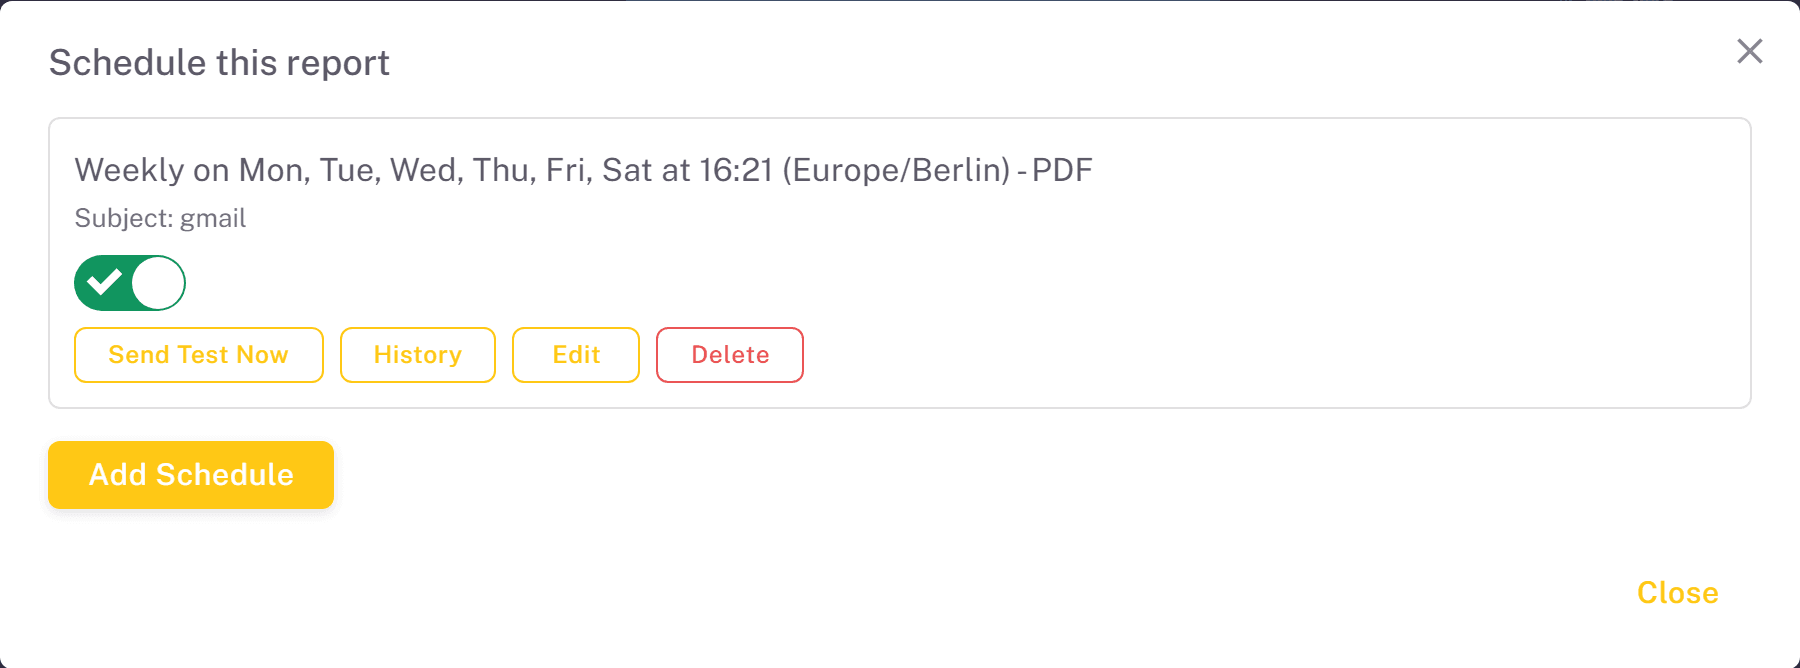
- The dialog lists the schedules you already have for this report. Click Add Schedule to create a new one.
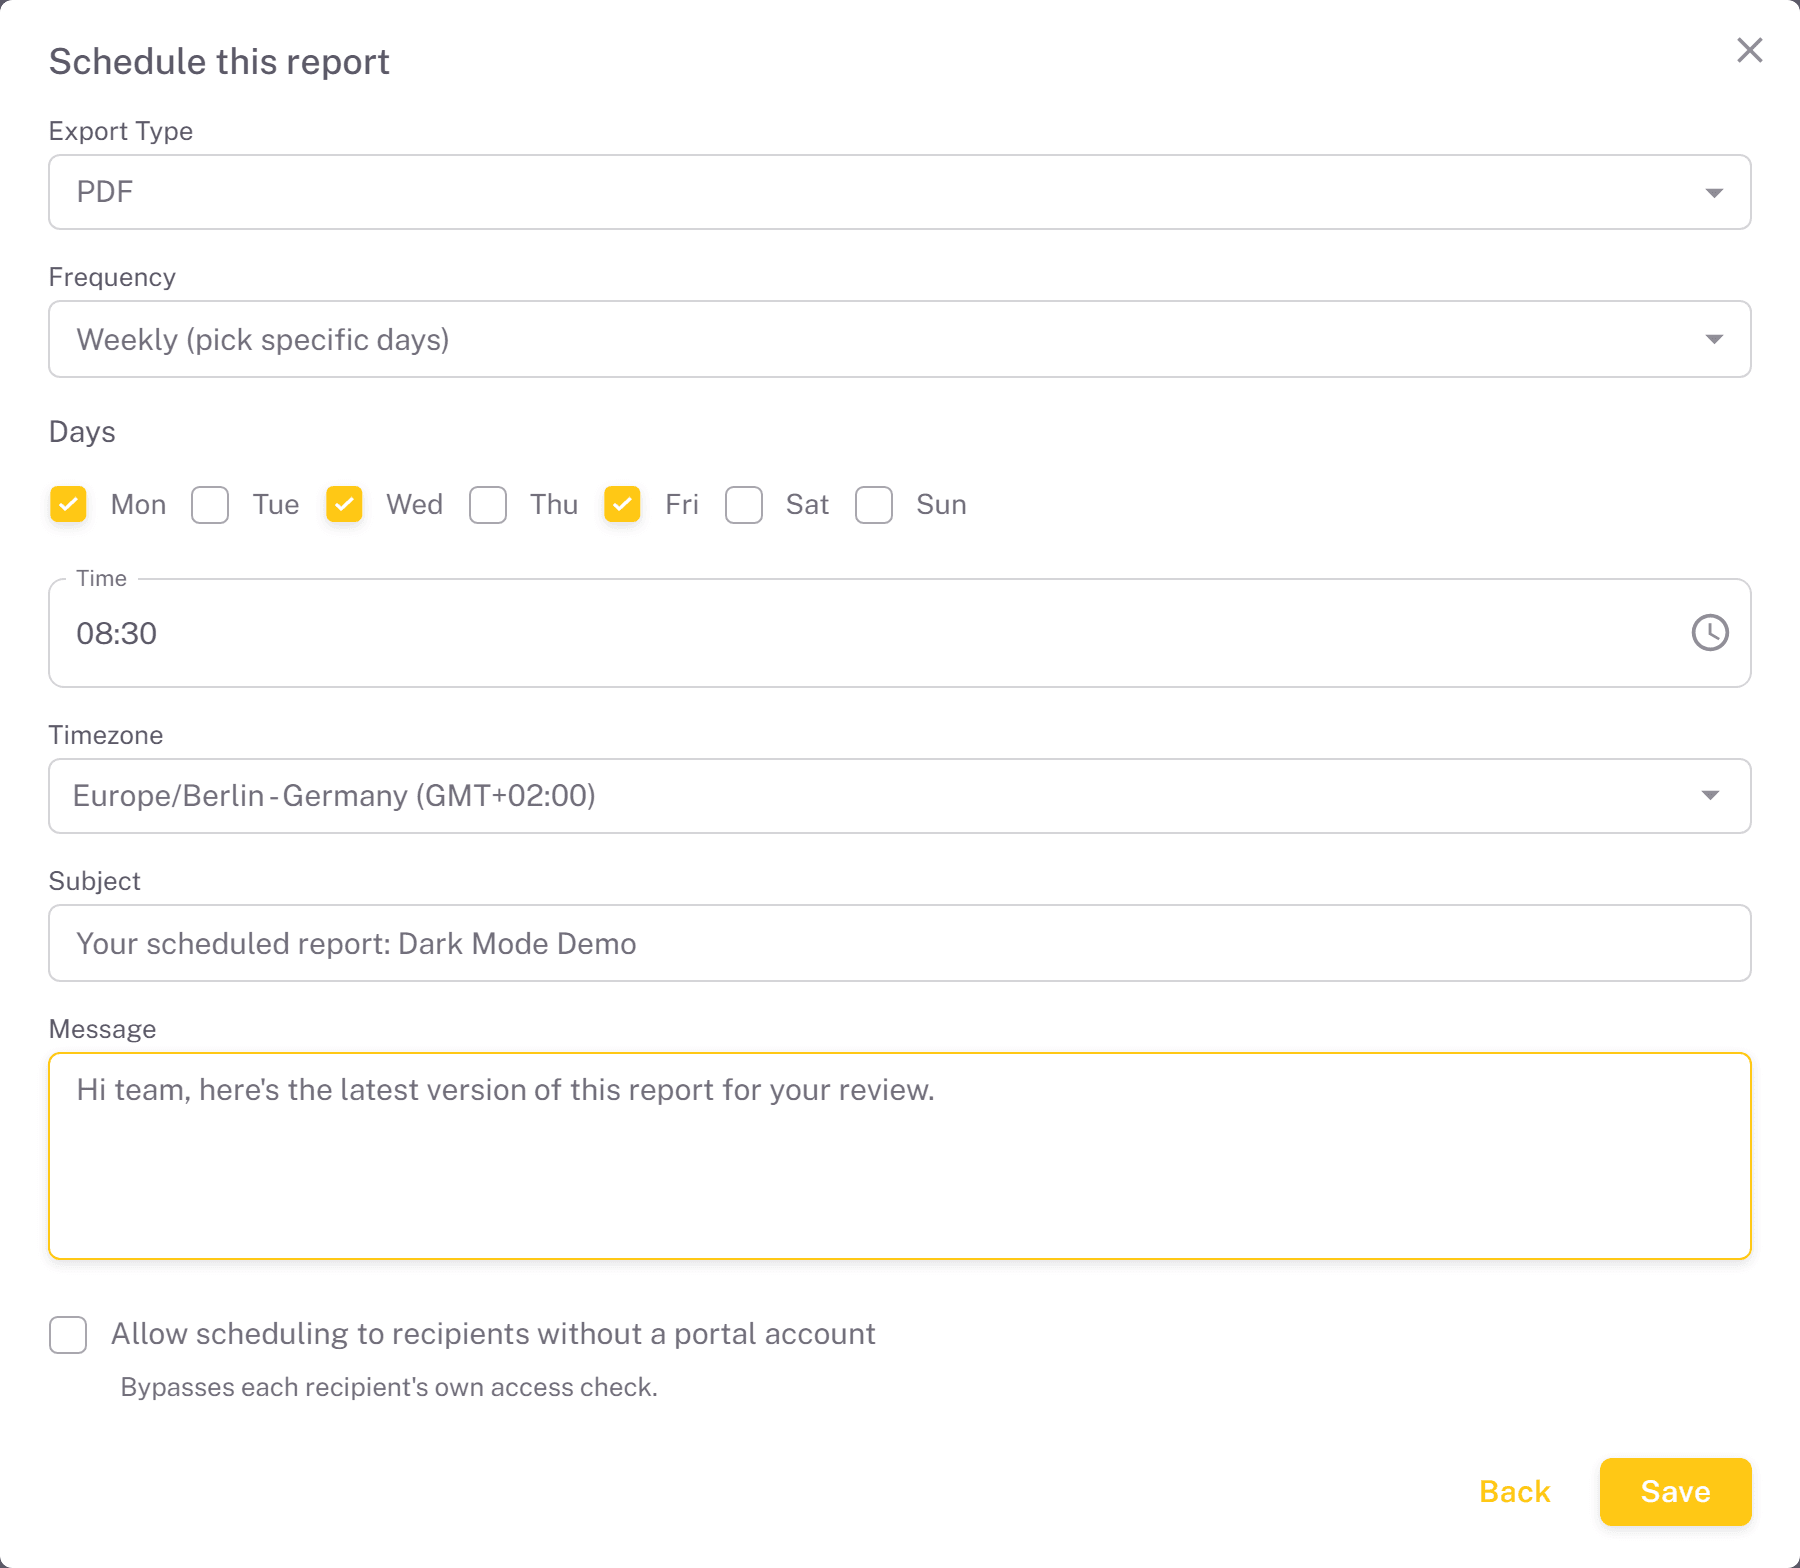
- Choose the Export Type and, if bookmarks are enabled for the report, optionally one of your own saved bookmark (otherwise the default view is exported). Set the frequency, time and timezone (see below), adjust the Subject (pre-filled with "Your scheduled report: <report name>"), write a Message and click Save. Subject and message are both required.
Frequency, time, and timezone
- Weekly - pick any combination of days, for example every weekday, or just Tuesday and Friday. All seven days means daily.
- Monthly - pick one or more days of the month and/or Last day. A month that doesn't contain a selected day (e.g. day 31 in April) is skipped for that day, not moved.
The time uses the 24-hour format and defaults to 09:00. The timezone defaults to your browser's timezone; search the list by city or region - each entry shows the country and current UTC offset. Daylight saving time is handled automatically.
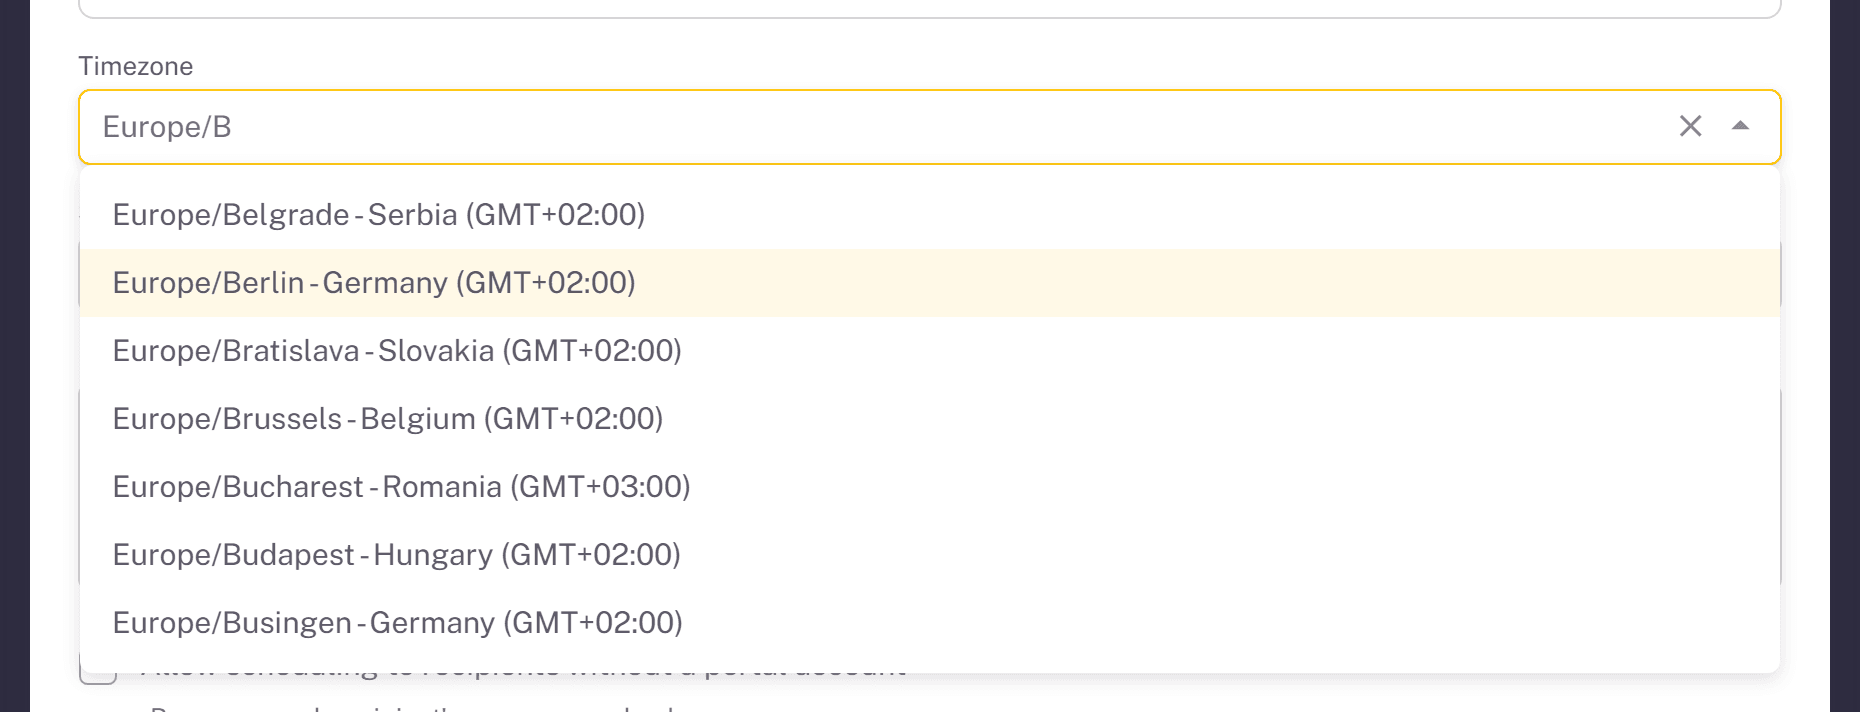
Scheduling to other recipients
You are always a recipient of your own schedule. The Recipients field for adding more people only appears when scheduling for others is enabled for you on this report (see Enabling scheduling permissions). Type an email address and click Add.

- Recipients must already have a portal account - only admins can add addresses without one (see below).
- At every delivery, each recipient's own access to the report is checked and the export is filtered by their own row-level security role. A recipient who has lost access doesn't receive the report, and the run is recorded as failed for them.
- If a recipient's roles give them the report under several different row-level security roles, they receive one email per role, with the role name added to the subject.
If you open a schedule that already sends to others but the permission has since been removed, the form tells you that saving will fail until the permission is restored or the other recipients are removed.
What recipients receive
- A plain-text email with your subject and message, and the export attached, named after the report (e.g.
P&L.pdf). - PNG exports of reports with more than one page arrive as a
.zipfile with one image per page. - Exports larger than the sending limit are not sent; the run is marked
too_largein the run history. The limit is 20 MB by default; admins change it with Max Email Attachment Size for Scheduled Reports (MB) in Global Settings.
Managing your schedules
Each schedule in the dialog shows its frequency and export type, an on/off switch to pause or re-activate it, its health status, and the buttons Send Test Now, History, Edit and Delete.
Testing a schedule
Send Test Now runs the export and emails every recipient immediately. The result opens in a dialog with the delivery status per recipient - large reports can take a while. Test sends are labelled Test in the history and don't affect the health status or the auto-pause counter.

Run history
History shows the last 10 deliveries: whether each was a scheduled or a test run, the recipient, the row-level role used, status, scheduled time, attempts, file size and the error message if something went wrong. Every export and every email is attempted up to three times before it counts as failed. Run history is kept for 180 days.
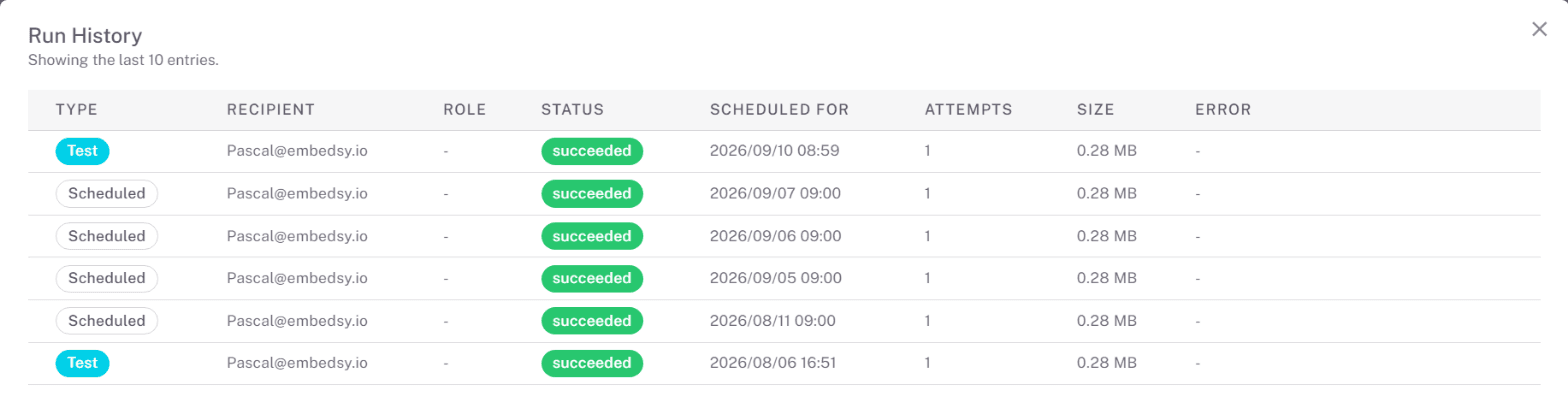
Health status, notifications, and auto-pause
The on/off switch and the health status are independent: a schedule can be switched on and still be failing. The health pill reflects the most recent delivery:
- Healthy - every recipient received the report.
- Partial failures - some recipients received it, others didn't.
- Failing - nobody received it.
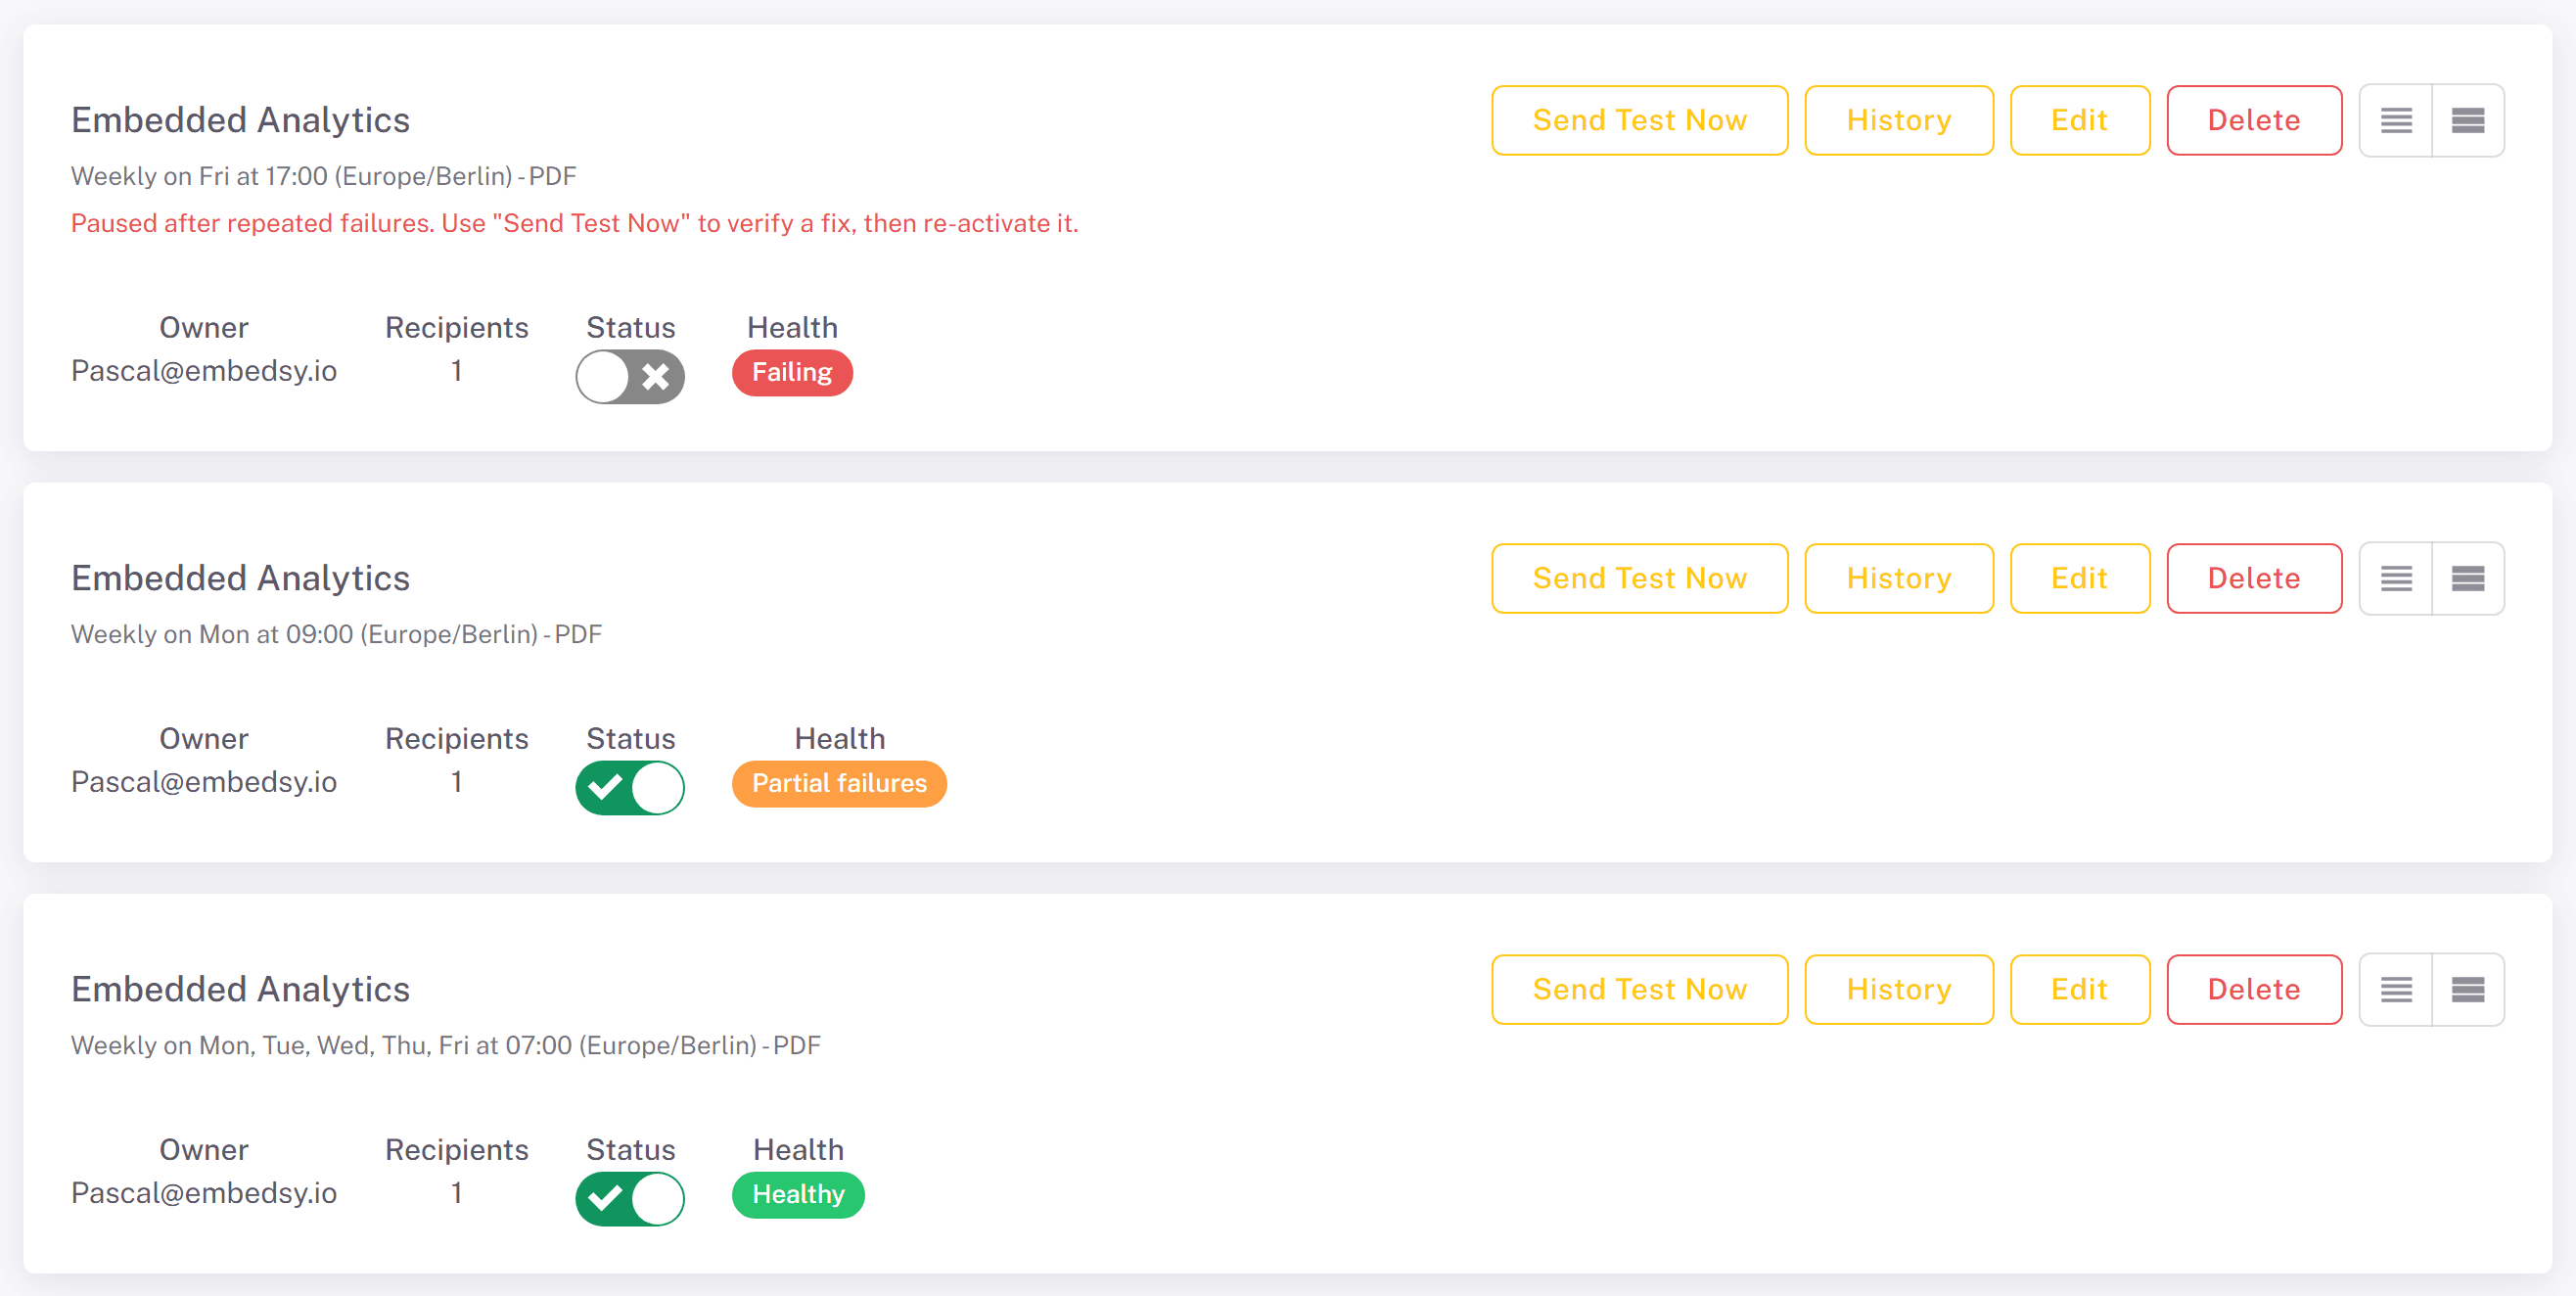
A delivery that fails is retried automatically, so a temporary problem usually resolves itself without anyone stepping in.
The schedule owner gets an email whenever a scheduled delivery fails or partially fails, including the error and, for common problems, a plain-language hint.
A schedule pauses itself automatically, and emails the owner, in two situations:
- After three failed deliveries in a row. Fix the cause, use Send Test Now to confirm, then switch the schedule back on.
- When the owner loses a permission it needs - Can schedule reports, access to the report, or (for schedules that send to others) the "schedule for others" permission. This is checked before every delivery and every test send. Nothing is deleted: restore the permission, then re-activate the schedule.
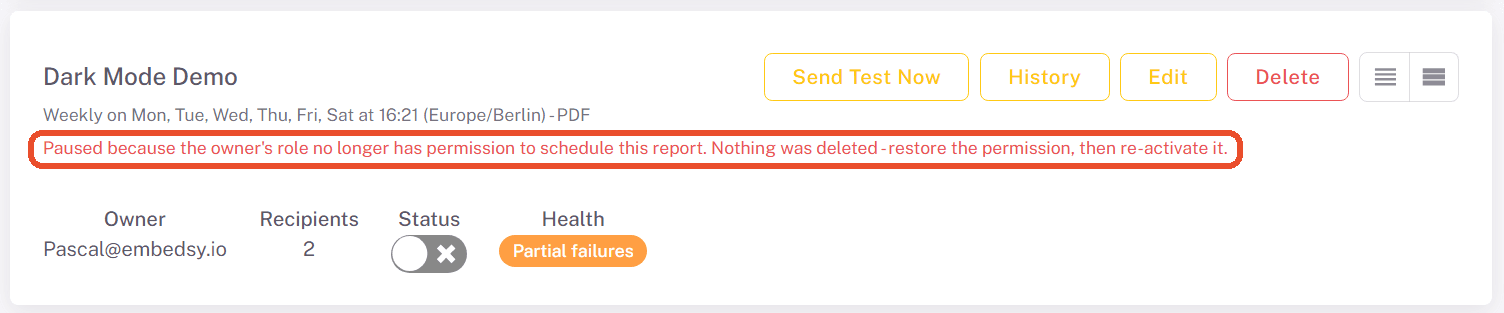
Editing a schedule's settings clears its health status and failure counter.
Report Scheduling requires an active Premium subscription or trial. If it lapses, no scheduled or test emails are sent, but your schedules, recipients and history are kept and resume once the subscription is active again.
Admin: managing all schedules
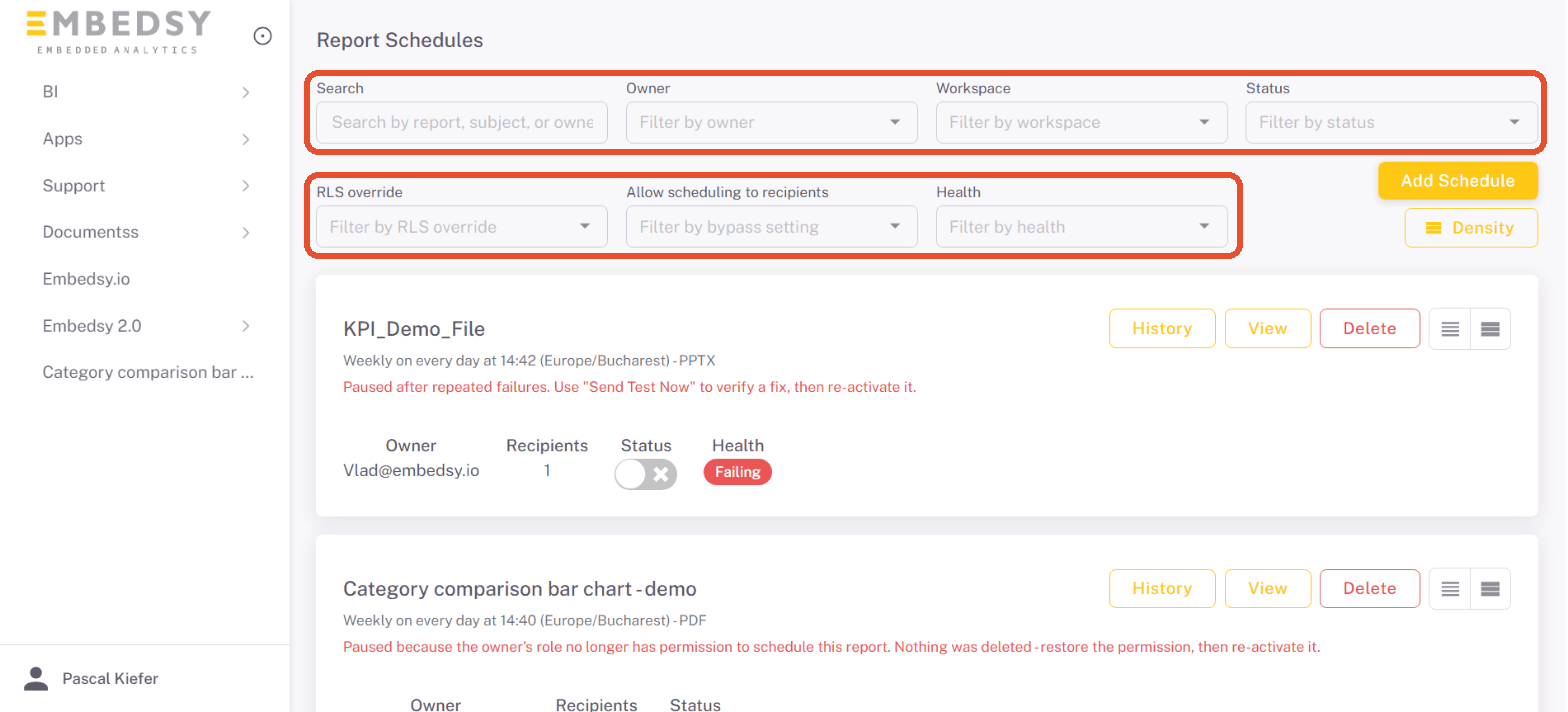
Admins and super admins have a Report Schedules page that lists every schedule in the portal, across all users.
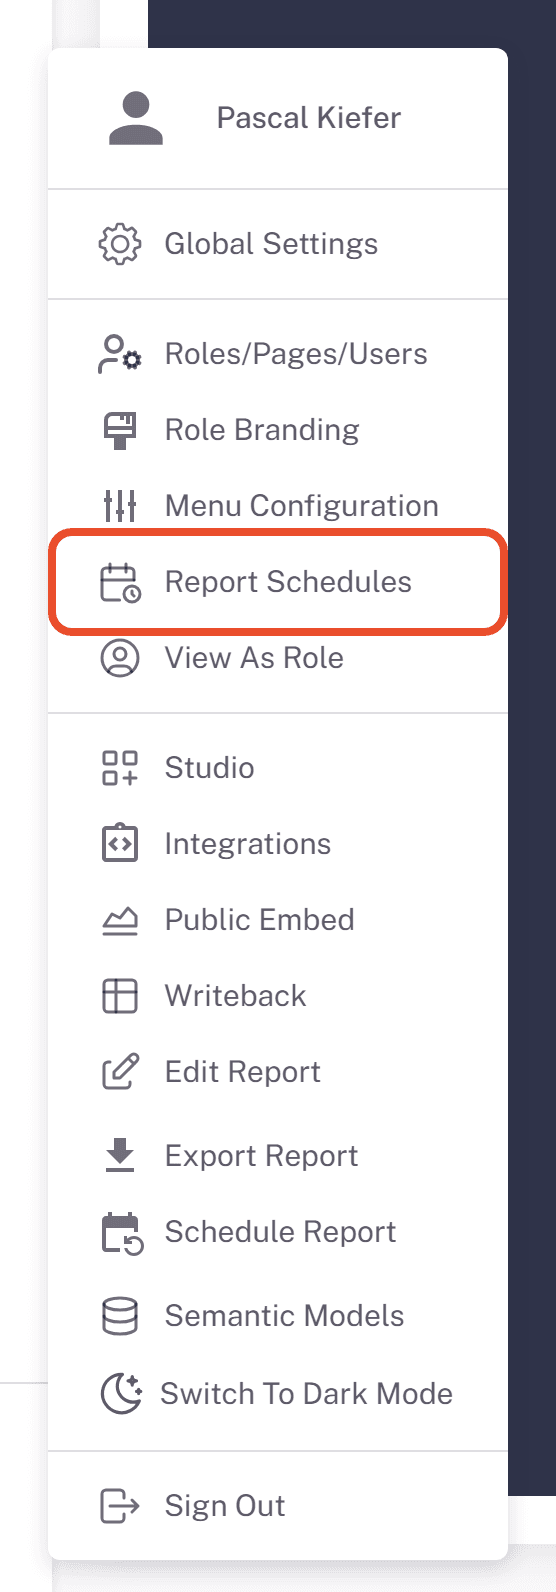
- Click your name at the bottom of the navigation and select Report Schedules.
- Each schedule shows its owner, number of recipients, status and health. Search by report, subject or owner, and filter by Owner, Workspace, Status, RLS override, Allow scheduling to recipients (without a portal account) and Health.
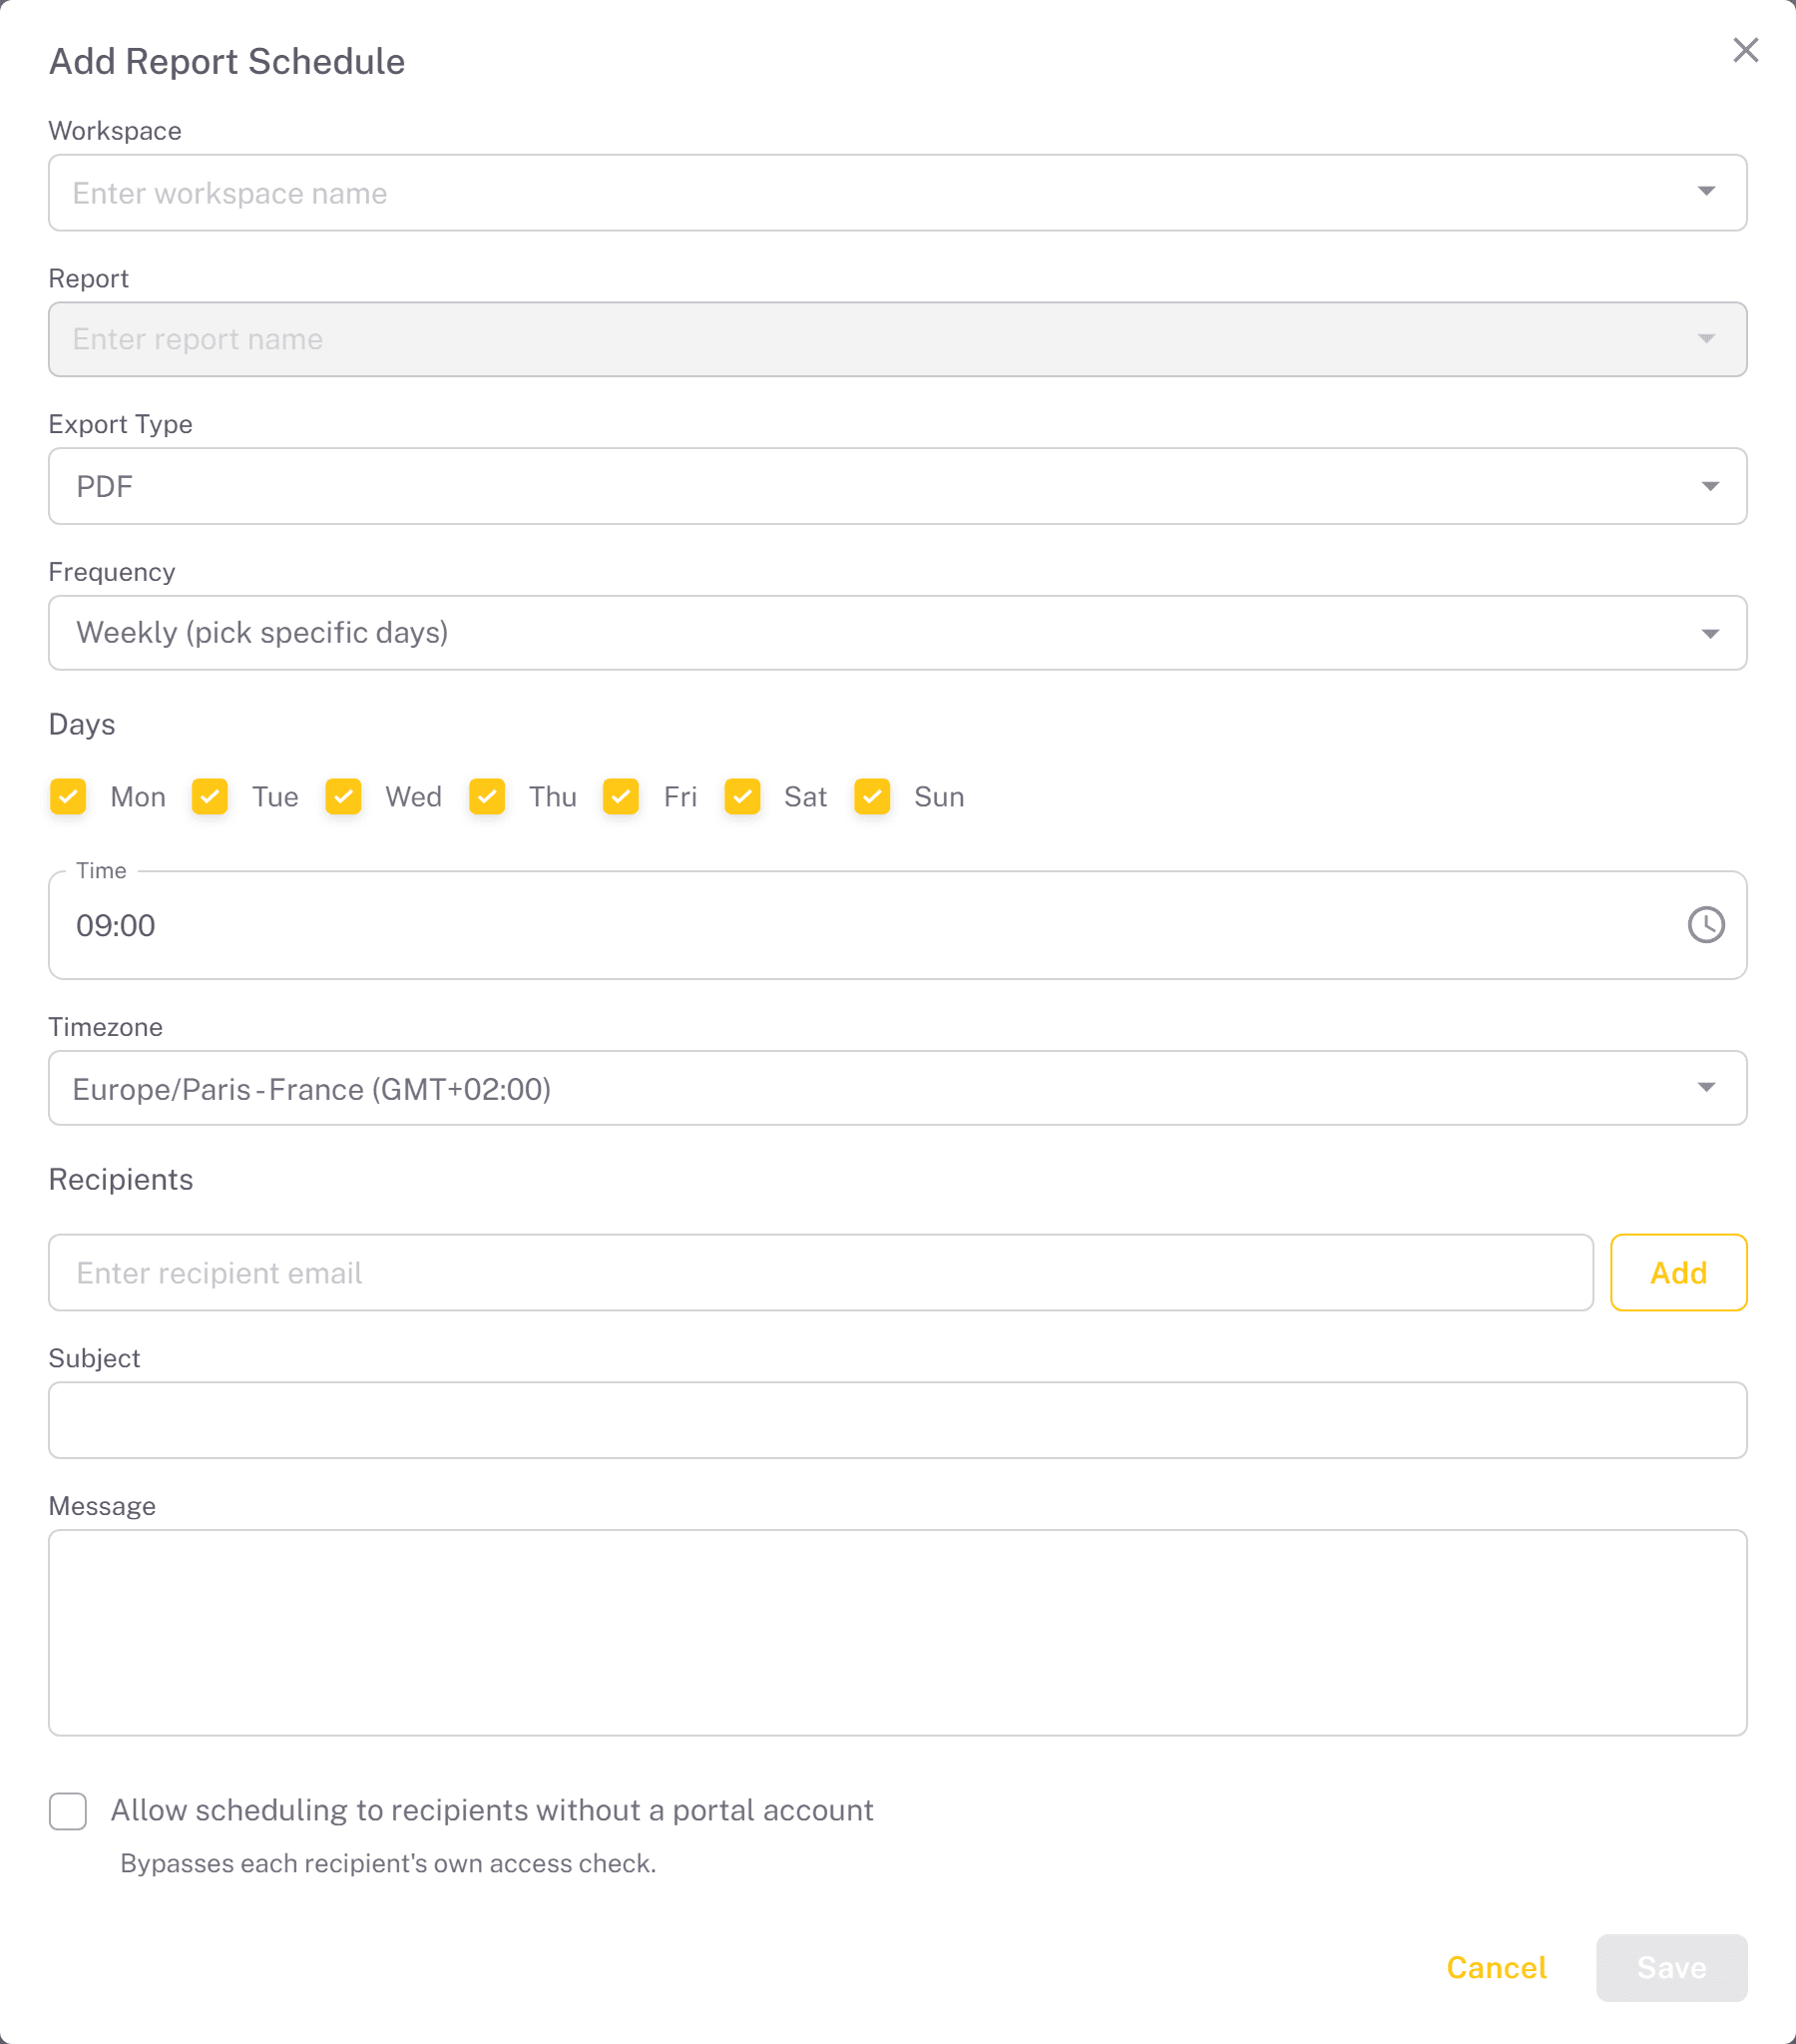
- Click Add Schedule to create a schedule for any report in any Power BI workspace, including reports that aren't added to a page. This requires Can schedule reports on one of your roles.
Schedules owned by other users
Admins oversee other people's schedules, but only the owner can change them, because deliveries run under the owner's permissions. On a schedule you don't own you can:
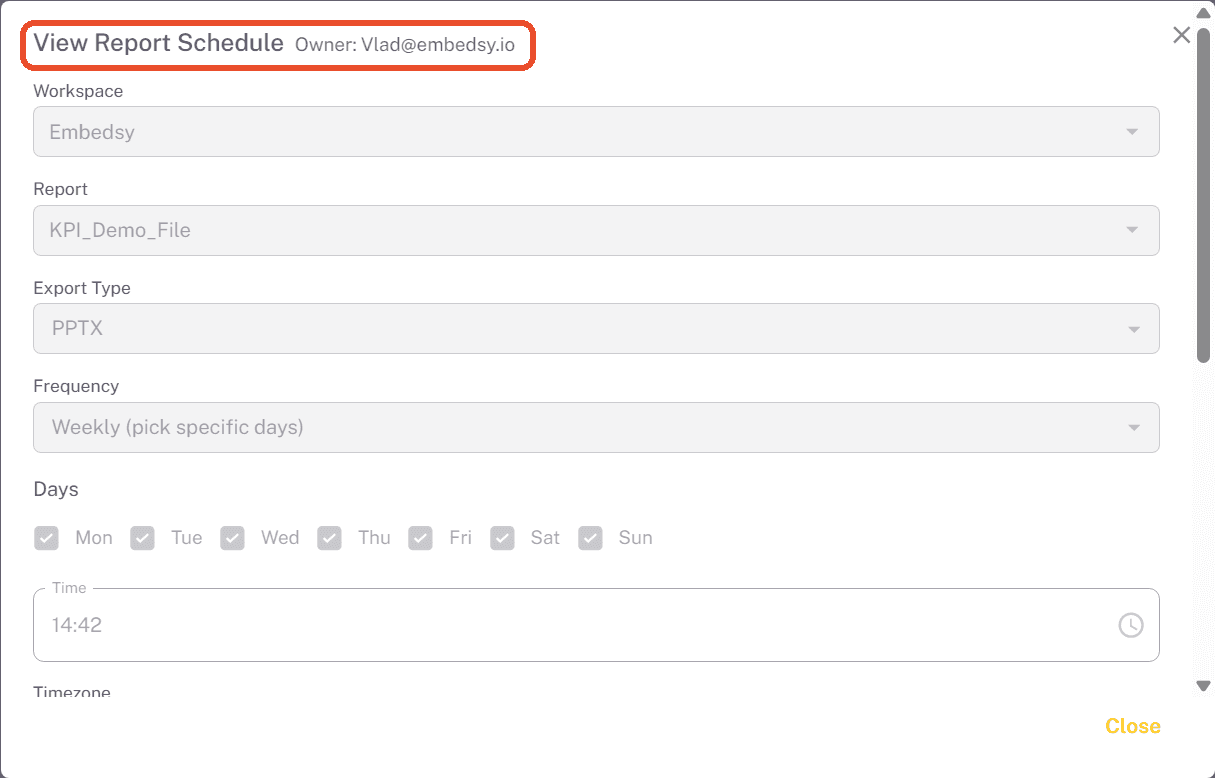
- View it - the form opens read-only with the owner's name at the top.
- History - see its deliveries and errors.
- Pause it with the status switch. You'll be asked to confirm, because only the owner can switch it back on.
- Delete it. The owner is not notified.
Editing, sending a test and re-activating are reserved for the owner.
Admin: recipients without a portal account
The Allow scheduling to recipients without a portal account checkbox (admins only) lets a schedule go to any email address. It skips each recipient's individual access check: the report is exported once and the same file is sent to every recipient.
It requires the same "schedule for others" permission described above - a role permission plus the per-report toggle. Until both are in place, the checkbox is greyed out with an explanation.

Admin: RLS override and dynamic row-level security
If the report's semantic model uses row-level security, admins see an RLS override section with the option Use a shared RLS role for all recipients.
- Off (default) - each recipient's own role and identity are resolved automatically.
- On - one role is applied to the whole export. Each recipient's access to the report is still checked, unless "recipients without a portal account" is also enabled.
- When "recipients without a portal account" is enabled, the shared role is switched on automatically and a row-level role is required, since one shared export can't resolve a separate role per recipient.
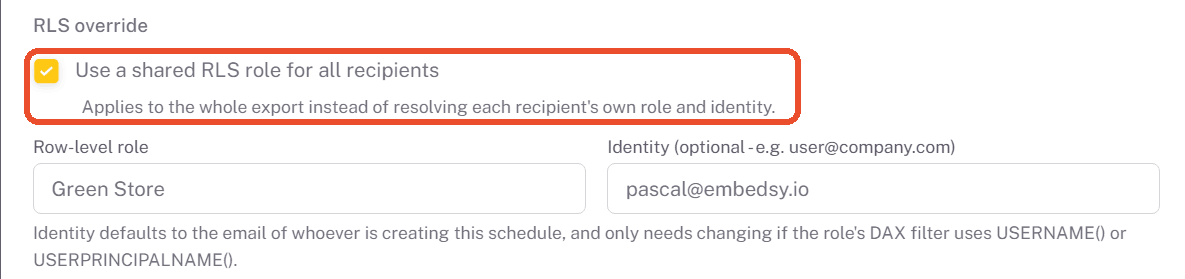
The override has two fields: Row-level role (required, and it must match a role name defined in the semantic model exactly) and Identity (optional, defaults to the email of whoever creates the schedule). Whether you need to change the identity depends on how the role's filter is defined:
- Static RLS (for example
[Region] = "West") filters on a fixed value. The identity has no effect, so the default is fine. - Dynamic RLS uses
USERNAME()orUSERPRINCIPALNAME()in the filter. Those functions return the Identity value, so set it to whatever the model expects (often an email address, but model-dependent).
To check which kind you have, look at the role's DAX filter in Power BI Desktop (Modeling → Manage roles). See Microsoft's documentation on embedding a report with RLS and the row-level security guidance for details.
Permissions summary
| To do this | You need |
|---|---|
| Schedule a report to yourself | A role with Can schedule reports, and access to the report (admins can pick any report) |
| Add other portal users | Additionally Can schedule reports for other recipients on a role that has the report on a page with Allow scheduling to other recipients |
| Add recipients without a portal account, or set an RLS override | Admin or super admin, plus the permissions above |
| See, pause and delete every schedule | Admin or super admin |
| Edit, test or re-activate a schedule | Being its owner, with Can schedule reports |
Troubleshooting
| Error contains | What to check |
|---|---|
ErrorAccessDenied | The app's email permissions - see Service Principal. |
Export report was called with a bad request | The row-level role doesn't exactly match a role in the semantic model (typos, extra spaces). |
requires effective identity to be provided | The semantic model uses row-level security but no role is configured - set one on the page or in the schedule's RLS override. |
Power BI capacity is not currently available | The capacity couldn't be resumed in time for the delivery. A delivery starts a paused, auto-managed capacity itself and waits up to three minutes for it. |
Export did not complete within | The export took longer than 5 minutes - usually a very large report or a capacity under heavy load. |
exceeds the ... MB sending limit | The file is too large to email - use a bookmark or filters to reduce the content, or a different export type. |